
These Garlic Sauteed Green Beans Will Change How You Feel About Vegetables
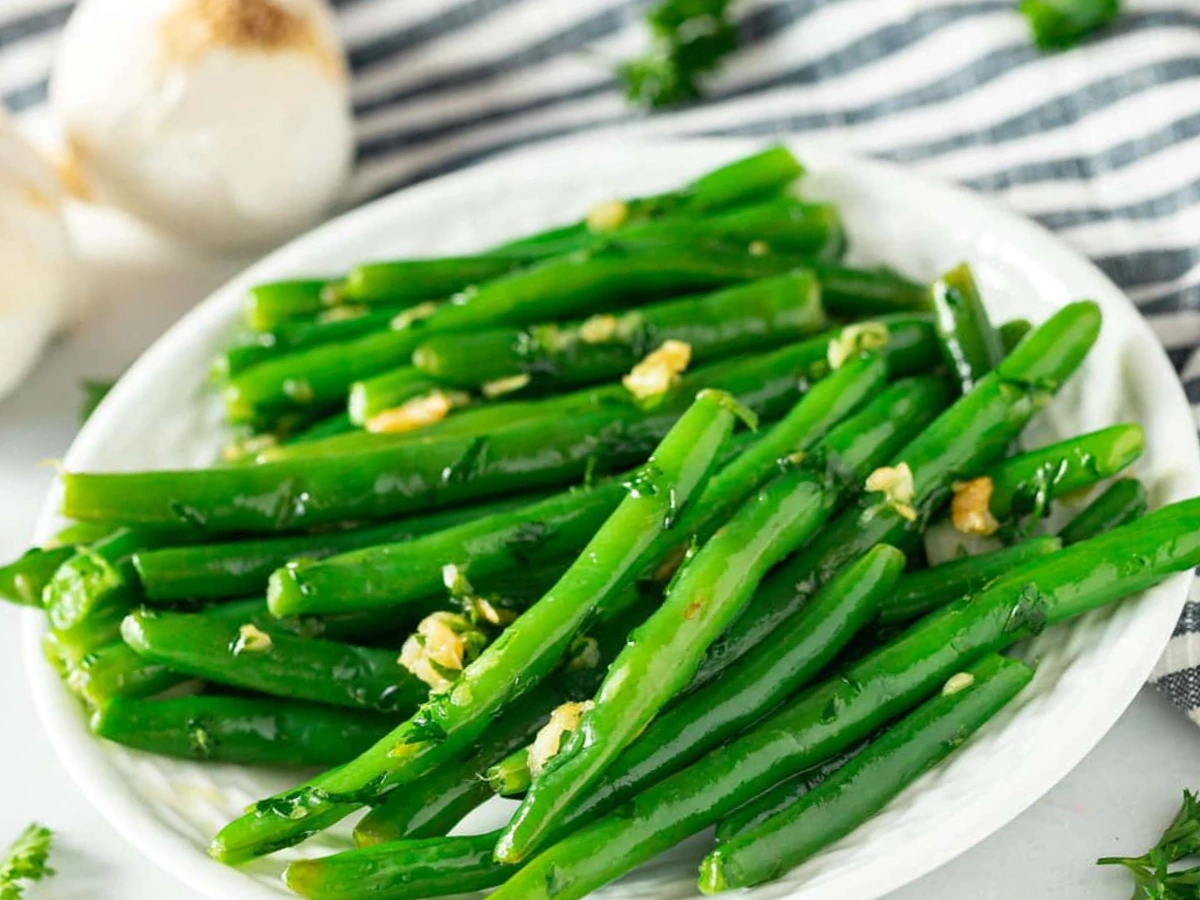
If steamed green beans have ever left you underwhelmed, you’re not alone. I used to serve them soft and bland, until I grabbed a skillet and changed the game. These sauteed green beans are quick, garlicky, and full of flavor. That rich butter sizzle? It turns plain green beans into a side dish everyone actually wants. They’re crisp-tender, vibrant, and done in 15 minutes, proof that simple ingredients can still steal the show.
Why You’ll Love These Sauteed Green Beans
Last Thanksgiving, I was scrambling to find a green vegetable dish that wouldn’t take up precious oven space and could be prepared at the last minute. These sauteed green beans saved the day! My brother-in-law, who typically avoids anything green, actually asked for the recipe. That’s when I knew I had a winner on my hands.
- Quick and effortless: From prep to plate in just 15 minutes, making these perfect for busy weeknights when you need a nutritious side dish but don’t have hours to spend in the kitchen.
- Versatile companion: These beans pair beautifully with everything from grilled chicken to holiday roasts, making them your go-to side dish year-round.
- Nutrition powerhouse: Get a healthy serving of vitamins A, C, and K along with fiber, all while enjoying a dish that tastes indulgent thanks to that garlic butter finish.
- Kid-approved: The mild garlic flavor and tender-crisp texture have converted many vegetable skeptics in my house, even my 10-year-old who “hates green things” gives these a thumbs up!
- One-pan wonder: Everything cooks in a single skillet, meaning less cleanup and more time enjoying your meal.

KEY INGREDIENTS BREAKDOWN
Fresh green beans: The star of the show! Look for beans that are bright green without blemishes and snap crisply when bent. Younger, thinner beans tend to be more tender and cook more quickly.
Olive oil: Just a teaspoon creates the perfect base for sautéing. I use extra virgin for a subtle flavor boost, but any olive oil works great.
Butter: This is what transforms ordinary beans into something special. It creates a silky sauce that clings to each bean. I sometimes use salted butter and adjust the added salt accordingly.
Garlic: Fresh minced garlic provides a warm, aromatic flavor that mellows beautifully when cooked in butter. Pre-minced jarred garlic works in a pinch, but fresh delivers the best flavor.
Lemon zest: Don’t skip this! The oils from the lemon peel add a bright citrus note that balances the richness of the butter without making the dish taste lemony.
Water or stock: This creates steam that helps cook the beans through without having to sauté them until they’re limp. Chicken or vegetable stock adds a subtle depth of flavor, but water works perfectly too.
VARIATIONS + SUBSTITUTIONS
Make it dairy-free: Substitute the butter with additional olive oil or a plant-based butter alternative. Many of my vegan friends swear by Earth Balance for this recipe.
Add some crunch: Sprinkle with 2 tablespoons of toasted sliced almonds or pine nuts just before serving.
Herb it up: Add 1 teaspoon of fresh thyme leaves or 1 tablespoon of chopped fresh parsley along with the garlic for an herbal twist.
Spice lover’s version: Add a pinch of red pepper flakes when you add the garlic for a gentle heat that complements the butter and beans beautifully.
Cheesy finish: Sprinkle with 2 tablespoons of freshly grated Parmesan cheese just before serving for a nutty, savory element.
Protein boost: Toss in 1/4 cup of crumbled bacon or pancetta when adding the butter for a hearty spin.
STEP BY STEP SUMMARY INSTRUCTIONS
Step 1: Prep and Initial Sauté
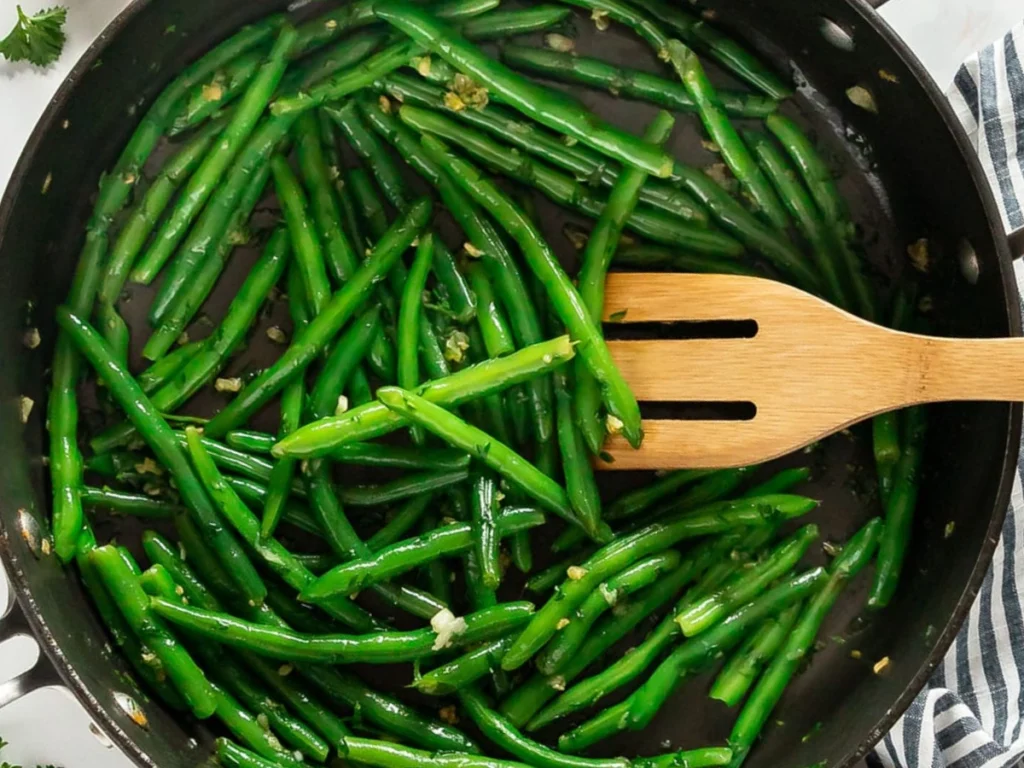
Heat that teaspoon of olive oil in a wide skillet over medium-high heat until it shimmers. Add your trimmed green beans and sprinkle with salt. Now, don’t just let them sit there! Toss them around every 30 seconds or so for about 5 minutes. You’re looking for them to start developing those lovely little blisters, those caramelized spots are flavor gold mines!
Step 2: Steam to Perfection
Once you see some blistering, pour in your 1/4 cup of water or stock. This is where the magic happens! Quickly cover the skillet (no worries if you don’t have a perfect lid, foil works in a pinch). Let them steam for exactly 2 minutes. This brief steaming helps cook the beans through while maintaining that perfect crisp-tender texture we’re after.
Step 3: Reduce and Flavor
Uncover and reduce the heat to medium-low. Let any remaining liquid evaporate, usually takes about a minute. Now’s the time to add your flavor boosters: butter, minced garlic, lemon zest, and pepper. The residual heat will melt the butter and warm the garlic just enough to release its aroma without burning (burned garlic is bitter, and we don’t want that!).
Step 4: Final Toss and Serve
Stir everything for just about a minute, making sure each bean gets coated in that aromatic garlic butter. You’ll know they’re done when the beans are bright green and still have a slight snap when you bite into one. Serve immediately for the best flavor and texture!
A Few Helpful Tips
- Don’t overcook your beans! They should still have a slight bite to them. Overcooked beans turn mushy and lose their vibrant color.
- Prep ahead by trimming beans up to 2 days in advance. Store them in a paper towel-lined container in the fridge to maintain freshness.
- Watch your heat when adding garlic. Garlic burns quickly and becomes bitter, so keep the heat moderate and stir constantly during that final cooking minute.
- For extra-special occasions, use a mixture of green and yellow wax beans for a colorful presentation that looks gorgeous on the table.
- If your beans are particularly thick, consider increasing the steaming time by 1 minute for perfect tenderness.
HOW TO CHOOSE THE BEST GREEN BEANS
When shopping for green beans, look for ones that are vibrant green with no brown spots. They should feel firm and snap cleanly when bent, not bend limply. Smaller, younger beans generally have better flavor and more tender texture than larger, older ones.
I prefer buying beans from the loose bin rather than pre-packaged, as I can select exactly what I want. If you’re shopping at a farmers’ market in summer, try to get them early in the day when they’re freshest. The peak season for green beans is May through September, but good-quality beans are available year-round in most grocery stores.
WHY SAUTÉING BEATS STEAMING
I used to be a die-hard steamer when it came to green beans. But after discovering this sautéing method, I’ve never looked back! Steaming green beans often leaves them waterlogged and lacking in flavor. Sautéing, on the other hand, allows the beans to develop rich, caramelized notes while still cooking through perfectly.
The brief steaming step in this recipe gives you the best of both worlds: beans that are cooked through but still have a wonderful flavor concentration from the initial sauté. This hybrid cooking method is my secret weapon for vegetable side dishes that everyone actually wants to eat!
Serving Suggestions + Pairings
These sauteed green beans are incredibly versatile and pair beautifully with so many main dishes:
- Serve alongside a juicy herb-roasted chicken for a simple yet elegant dinner.
- They’re perfect with grilled salmon or any seafood, the lemon notes complement fish beautifully.
- For a vegetarian meal, pair with creamy mashed potatoes and mushroom gravy.
- They make an excellent side for holiday meals with roast turkey or ham.
- For a complete weeknight dinner, serve with baked chicken thighs and wild rice pilaf.
For toppings, try a sprinkle of toasted almonds, a squeeze of fresh lemon juice, or some shaved Parmesan cheese to take these beans to the next level.
STORAGE, REHEATING, AND FREEZING TIPS
Refrigerator storage: Place cooled leftover green beans in an airtight container and refrigerate for up to 4 days. The flavor actually deepens overnight, making these great for meal prep!
Reheating: For best texture, reheat gently in a skillet over medium-low heat for 3-4 minutes until just warmed through. Microwave reheating works in a pinch (1 minute on 70% power), but the texture won’t be quite as good.
Freezing: While you can freeze these sauteed green beans, they will lose some of their crisp texture when thawed. If freezing, slightly undercook them initially, cool completely, then store in an airtight container for up to 2 months. Thaw in the refrigerator overnight before reheating.
Make-ahead tips: If preparing for a party or holiday meal, you can blanch the green beans in advance (boil for 2 minutes, then plunge into ice water). Pat them dry, refrigerate, and finish the recipe just before serving, this cuts your cooking time in half when you’re busy with other dishes!
FAQ
Can I use frozen green beans for this recipe?
While fresh beans deliver the best texture and flavor, you can use frozen in a pinch. Don’t thaw them first, add them frozen directly to the hot pan and extend the cooking time by about 2-3 minutes. The texture will be softer than with fresh beans, but the flavor will still be delicious.
How do I know when the green beans are perfectly cooked?
The perfect sauteed green bean should be bright green and tender-crisp, meaning you can bite through easily but still feel a slight snap. If you’re uncertain, taste one! It should not be crunchy like a raw bean, but should still have some texture.
Can I make these ahead for a dinner party?
Yes! Either pre-blanch them as mentioned in the storage tips, or fully cook them and reheat in a hot skillet just before serving. Add an extra small pat of butter when reheating to refresh the flavor.
My family doesn’t like garlic. Can I still make this recipe?
Absolutely! You can omit the garlic entirely and these beans will still be delicious. Try adding 1/4 teaspoon of onion powder instead, or experiment with herbs like thyme or dill for a different flavor profile.
Enjoying These Sauteed Green Beans
I keep coming back to these sautéed green beans no matter the season. They’re just as at home next to grilled chicken in July as they are beside roast beef in December. Simple, quick, and packed with flavor, this is the kind of side dish that actually gets finished first. So next time green beans land in your grocery haul, don’t overthink it. A hot pan, a little garlic butter, and you’re minutes away from a side that’s way better than it has any right to be.
When You Try It, We’d Love to Hear About It
Tag us, @evryfoodie, on your favorite social media – Facebook, Instagram, TikTok or Twitter!
We’d love to see your delicious creation.

Best Sauteed Green Beans: Easy, Fast & Flavor-Packed
If steamed green beans have ever left you underwhelmed, you’re not alone. I used to serve them soft and bland, until I grabbed a skillet and changed the game. These sauteed green beans are quick, garlicky, and full of flavor. That rich butter sizzle? It turns plain green beans into a side dish everyone actually wants. They’re crisp-tender, vibrant, and done in 15 minutes, proof that simple ingredients can still steal the show.
- Total Time: 15 minutes
- Yield: 4 servings 1x
Ingredients
1 pound (450g) fresh green beans, stem ends snapped off
1 teaspoon olive oil
1/4 teaspoon fine sea salt
1/4 cup (60ml) water or stock
1 tablespoon butter or vegan butter
3 medium garlic cloves
1/2 teaspoon lemon zest
1/4 teaspoon fresh ground black pepper
Lemon wedges, for serving
Instructions
- Add a swirl of oil to a wide skillet and set it over medium-high heat. Toss in the green beans and sprinkle with 1/4 teaspoon of salt.
- Cook for about 5 minutes, stirring occasionally, until the beans are bright green and lightly blistered in spots.
- Pour in a splash of water or stock, just enough to create a little steam. Cover the pan—foil works if you don’t have a lid—and let it steam for 2 minutes.
- Uncover the skillet, turn the heat down to medium-low, and let the liquid cook off.
- Add the butter, garlic, lemon zest, and a few grinds of black pepper. Stir everything around for about a minute, just until the garlic is fragrant.
- Serve warm and enjoy every garlicky, buttery bite!


- Prep Time: 5 minutes
- Cook Time: 10 minutes
- Category: Side Dish
- Method: Stove
- Cuisine: American
Share Your Experience and Customizations
Don’t forget to leave a rating and a comment below! We’d love to hear how it turned out for you. If you made any tweaks or added your own spin, let us know how it went, we’re all about seeing how y’all make it your own!
Similar recipes to check out
you might also LIKE TO check out
- USDA – Food Safety and Inspection
- Harvard T.H. Chan School of Public Health – Nutrition Source
- America’s Test Kitchen – Science of Cooking Section